
1. Giới thiệu về Màn hình LCD 16×2 và giao tiếp I2C:
- Màn hình LCD 16×2: Là một linh kiện phổ biến trong các dự án điện tử và lập trình. Nó có 16 chân, trong đó 8 chân dữ liệu (D0 – D7) và 3 chân điều khiển (RS, RW, EN). 5 chân còn lại dùng để cấp nguồn và đèn nền cho LCD 16×2.
- Module I2C LCD: Để giảm số lượng chân kết nối, bạn có thể sử dụng module I2C LCD. Thay vì cần 6 chân để kết nối với LCD 16×2, module I2C chỉ cần 2 chân (SCL, SDA). Module này hỗ trợ các loại LCD sử dụng driver HD44780 (LCD 16×2, LCD 20×4, …).
2. Cài đặt thư viện LiquidCrystal_I2C:
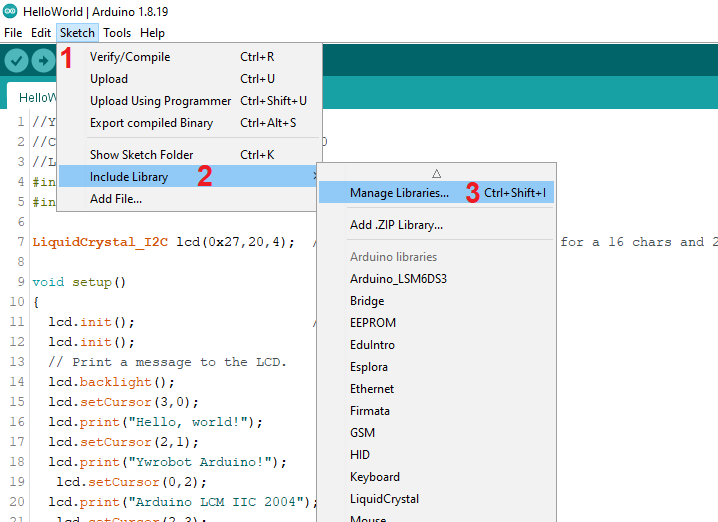
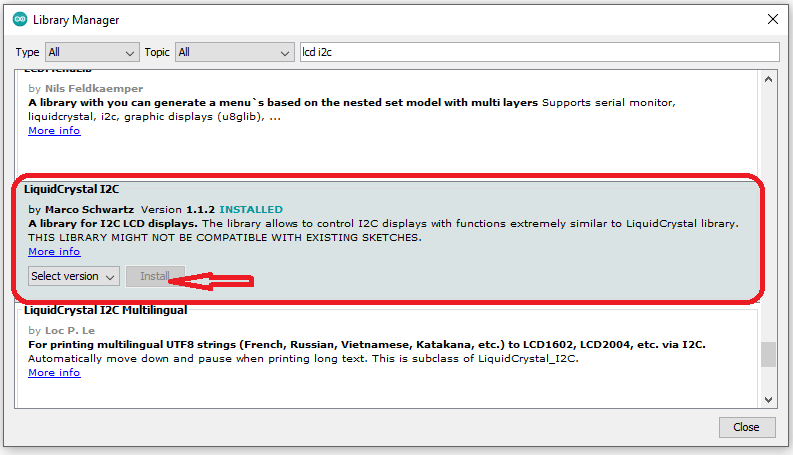
- Để sử dụng màn hình LCD giao tiếp I2C với Arduino, bạn cần cài đặt thư viện
LiquidCrystal_I2C. - Bạn có thể cài đặt thư viện này bằng cách mở Arduino IDE, chọn “Sketch” > “Include Library” > “Manage Libraries”. Tìm kiếm “LiquidCrystal_I2C” và cài đặt phiên bản mới nhất.
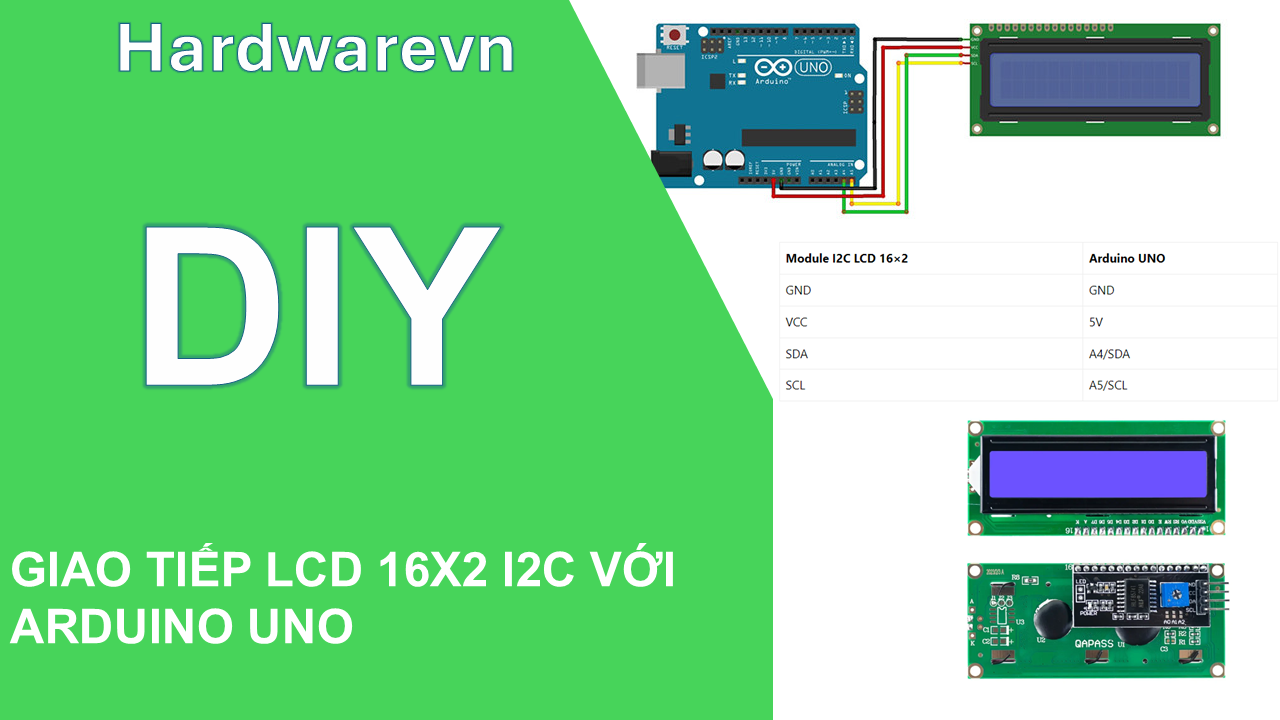
3. Kết nối và sử dụng:
- Kết nối module I2C LCD với Arduino UNO như sau:
- GND: GND
- VCC: 5V
- SDA: A4/SDA
- SCL: A5/SCL
- Sử dụng thư viện LiquidCrystal_I2C để hiển thị thông tin lên màn hình LCD.
- Địa chỉ I2C của module LCD: 0x33 hoặc 0x27, Code dưới đây dùng địa chỉ 0x27
Code mẫu:
#include <Wire.h>
#include <LiquidCrystal_I2C.h>
LiquidCrystal_I2C lcd(0x27,16,2);
void setup()
{
lcd.init();
lcd.backlight();
lcd.setCursor(3,0);
lcd.print(“DIEN TU HELLO”);
lcd.setCursor(4,1);
lcd.print(“XIN CHAO CAC BAN”);
}
void loop()
{
}
Code Đếm số 0 đến 9 LCD 16×2 I2C
#include <Wire.h>
#include <LiquidCrystal_I2C.h>
LiquidCrystal_I2C lcd(0X27,16,2); //SCL A5 SDA A4
int num=0;
void setup()
{
lcd.init();
lcd.backlight();
}
void loop()
{
lcd.setCursor(2,0);
lcd.print(“DIEN TU HELLO”);
lcd.setCursor(0,1);
lcd.print(“Dem so : “);
lcd.setCursor(10,1);
lcd.print(num);
num++;
if(num>=10){num=0;}
delay (1000);
lcd.clear();
}
Code tìm địa chỉ I2C cho module LCD:
// ————————————–
// i2c_scanner
//
// Version 1
// This program (or code that looks like it)
// can be found in many places.
// For example on the Arduino.cc forum.
// The original author is not know.
// Version 2, Juni 2012, Using Arduino 1.0.1
// Adapted to be as simple as possible by Arduino.cc user Krodal
// Version 3, Feb 26 2013
// V3 by louarnold
// Version 4, March 3, 2013, Using Arduino 1.0.3
// by Arduino.cc user Krodal.
// Changes by louarnold removed.
// Scanning addresses changed from 0…127 to 1…119,
// according to the i2c scanner by Nick Gammon
// http://www.gammon.com.au/forum/?id=10896
// Version 5, March 28, 2013
// As version 4, but address scans now to 127.
// A sensor seems to use address 120.
// Version 6, November 27, 2015.
// Added waiting for the Leonardo serial communication.
//
//
// This sketch tests the standard 7-bit addresses
// Devices with higher bit address might not be seen properly.
//
#include <Wire.h>
void setup()
{
Wire.begin();
Serial.begin(9600);
while (!Serial); // Leonardo: wait for serial monitor
Serial.println(“\nI2C Scanner”);
}
void loop()
{
byte error, address;
int nDevices;
Serial.println(“Scanning…”);
nDevices = 0;
for(address = 1; address < 127; address++ )
{
// The i2c_scanner uses the return value of
// the Write.endTransmisstion to see if
// a device did acknowledge to the address.
Wire.beginTransmission(address);
error = Wire.endTransmission();
if (error == 0)
{
Serial.print(“I2C device found at address 0x”);
if (address<16)
Serial.print(“0″);
Serial.print(address,HEX);
Serial.println(” !”);
nDevices++;
}
else if (error==4)
{
Serial.print(“Unknown error at address 0x”);
if (address<16)
Serial.print(“0”);
Serial.println(address,HEX);
}
}
if (nDevices == 0)
Serial.println(“No I2C devices found\n”);
else
Serial.println(“done\n”);
delay(5000); // wait 5 seconds for n
}